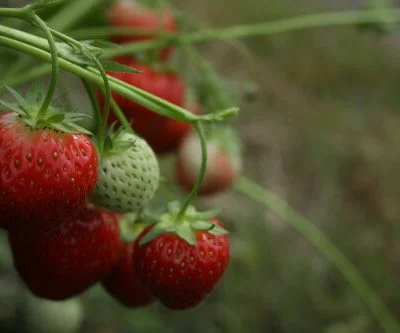
Growing strawberries in containers
No fruit plant could justifiably claim to be more suited to container cultivation than the strawberry and very good results can be achieved with quite a modest outlay. This method of cultivation is an ideal alternative where garden space is at a premium. Perhaps you wish to keep your strawberries close at hand, on the patio or terrace, or even by the door. Practically any container can be utlized provided it has a minimum depth of around 12”. The quantity of plants you can incorporate will be determined on the soil capacity of the container; the normal rules of plant spacing do not apply here since you will not be keeping them in the pots long-term. As a rule of thumb for strawberry plants a container size of, try to stick to 1 plant for about 1.5 litres of compost.
Always use a good quality proprietary all purpose compost. Do not use garden soil as it compacts too readily when used in containers. You can also make your own by mixing equal parts garden compost, plain peat and sharp sand with added fertilizer of your choice.
Growbags
Are often used for growing strawberries; it’s not my preferred method but it is convenient as the growbags come ready-made so to speak and all you have to do is slit a hole and pop them in. But you must be very vigilant in watering as there isn’t a great depth of compost for the plants to use. 3 plants will fit in a standard growbag. You can also use proprietary bags of compost – 60 and 80 litre are ideal – and simply cut holes in the bag yourself; because the volume of compost is greater than with growbags I often feel these are a better option although a little more expensive.
Hanging Baskets
Are a wonderful and novel way of growing strawberries! They make a very attractive feature and of course take up no garden space at all. A standard 12” hanging basket can incorporate three or 4 plants. Additional advantages are that the fruits hang temptingly down over the sides of the basket – a most attractive sight – and they keep clean with no soil-splashes, bacterial and fungal diseases tend to be kept at bay because the air circulation is better, and the plants and fruits tend to be troubled less by slugs. Such advantages do come at a price, however. You must be very vigilant in your watering, every day at least, or even twice a day, once in the morning and once in the evening, for really good results. Of course aerial containers such as this are very susceptible to drying out and the strawberries must have adequate moisture to develop the best, most plump berries, as well as to maintain the health of the plant.
In the long term
Whatever containers you plan to use, aim to keep them for one season, or two at the most. After that plant them into the garden if you can, or discard them and start again. Very regular watering is essential throughout the growing season. And regular feeding too is very important. Seaweed Maxicrop applied fortnightly as a foliar feed is a very good method of ensuring your container grown strawberries receive a regular dose of sustenance. You can also use Osmocote tablets which are very convenient to apply and one application will feed the plants for a whole growing season! In the case of containerised strawberries growmore and bonemeal are not so suitable.
Varieties to use
Any strawberry varieties will grow well in containers but to make recommendations I would probably discard those taller and more rangy growers as they will become very untidy in containers and the rich compost can actually encourage even taller growth! For this reason I would suggest varieties such as Cambridge Vigour, Emily, Honeyoye, Pantagruella, Brenda, Florence and the perpetual varieties such as Flamenco, Ostara and Aromel. Elvira is also often recommended for container growing. If you plan on doing several containers then aim for a good mix to cover the season but if you’re intentions are more modest then perhaps stick to a long-fruiting perpetual type, or the day-neutral ‘Seascape’ which will bear berries in flushes right through the season.
Getting early fruits – extending the strawberry season
With a little for-thought, it is quite easy to get valuable extra-early fruits that can extend your picking season by 3-6 weeks or more. Any and all varieties can be encouraged to fruit ahead of their natural season but the most value lies with the earlies. Cambridge Vigour remains at the forefront of most forcing programmes, Emily, Honeyoye and Elvira as well as Rosie are also very suitable regardless of the method you use.
In the gently heated greenhouse
By far the earliest crops will be gained by potting up established plants from a strawberry bed in February. New just-bought plants can also be used as long as they are of good quality and you will get some fruits but established plants will yield better. Pot the plants individually in 10” pots, using a good proprietary general purpose compost, watering well of course and place them in a greenhouse with a heater thermostatically controlled to maintain a minimum 50 degrees overnight and a gently agreeable 60 degrees during the daytime.
The plants will start to make active new growth almost immediately and after 2 weeks or so start providing additional foliar feed. Flowers will appear within 3-4 weeks and because of the closed environment you will need to pollinate them by hand using a soft haired brush or even a feather, because there will not be any flying insects inside the greenhouse to pollinate the flowers naturally.
The first fruits should be ripe by mid April – a full 6 weeks ahead of the outdoor season for strawberries.
Cloching
Is a good way of encouraging early ripening from established outdoor plants. You can either place the cloches over the plants as growth begins in early spring, or you can wait until flowering has just finished. If you decide to start early then you must remove the cloches at flowering time, and only during the day, to allow the flowers to be pollinated by insects. Then put them back over-night. Be prepared to give some extra water during this period because of course the plants will not receive natural rainfall. When harvesting has completed remove the cloches and give the plants a good haircut to tidy them up and remove any unwanted pests and diseased.
Pests and Diseasess
However hard you try to keep your plants healthy, a few gremlins are bound to appear from time to time. Prompt action, or better still, prevention where possible – is always the ideal.
Aphids [greenfly]
Are more of a problem in the Spring when the fresh new foliage is soft and just emerging. They cause the leaves to twist and curl and these leaves may also take on a yellowish tinge. If infestations are left unchecked they can weaken the plants and aphids also spread other diseases. They are relatively easy to deal with; cut away and burn infected leaves and then treat the plants with a systemic insecticide such as Provado. If you don’t want to use an insecticide and the infestation is light then a spray with soapy water can often do the trick. Biological controls are also available but these can take time to establish and have any effect.
Botrytis – grey mould
Occurs on the berries themselves; keeping the berries on a clean surface and away from wet soil lessens the chances of this problem occurring. It is more prevalent during wet summers or where overhead watering has been practiced. A good fungicidal spray can prevent the problem in subsequent years, applied as the flowers set.
Once the problem has already occurred the only cause of action is to remove infected fruits to limit the spread.
Mildew
Is easily identifiable by the silvery powder that occurs on newer leaf growths. Some varieties are more prone than others and plants grown under cover will be more susceptible; spray at the first sign with Systhane fungicide.
Leaf spots and blotches
Various fungi can infect and produce circular reddish or purple spots on the leaves, often fairly late in the season. You can spray with a fungicide but these symptoms aren’t usually too important.
Slugs
Are as partial to temptingly ripe strawberries as we are! There’s nothing more annoying than selecting a seemingly large and ‘perfect’ berry only to find than underneath it has a large hole! Good standards of husbandry and cleanliness will reduce the chances of slug infestations because the less shelter and decaying plant material there is in which to hide then the less happy the slugs will be. This applies to the surrounding area as well as the actual strawberry bed itself. Various remedies are on the market to deal with these slimy pests [which must alas also include the more endearing but none the less damaging snail] such as traps, deterrents and poisons.
Red Core
There is no cure for red core [also known as Red Stele] and where this disease has been identified in the past makes the soil unsuitable for growing strawberries so choose an entirely different area. The variety Red Gauntlet and also Allstar, are known to be red core resistant.
Red Core manifests itself as a general weakness in the plant with wilting yellowing leaves, stunted growth and fruits which are bitter and hard. Leaf stems and roots reveal a red inner core. The fungus is spread by water travelling through the soil. Soils which have better drainage are therefore less likely to get this disease.
Viruses
Are more of a symptom with older plants which is why it is important to replace your strawberries every 3-5 years. The symptoms are dwarf, stunted and yellowing plants which do not grow and remain largely unproductive. There is no ‘cure’ for virus except to dig up and burn infected plants, replanting with healthy new stock in a separate area. If you must use the same ground then either dig out the soil and replace with fresh topsoil, or treat it with jeyes fluid 6 months before re-planting.
Verticillium wilt
Is a serious disease, the symptoms if which are yellowing basal leaves and in turn the whole plant wilts and collapses. A fungicidal drench to the crown and roots of unaffected plants may help but this is a difficult disease to treat and often the only answer is to destroy the plants and start again elsewhere.
Vine Weevil
The symptoms of vine weevil are similar to verticillium wilt in that hitherto the plants appear healthy but suddenly wilt and no amount of watering revives them; however Vine weevil is easy to distinguish because a gentle tug on the affected plant and it will simply come away from the soil with most of it’s roots eaten away beneath. Fat white grubs can be seen in and around the base where the roots were. The adult vine weevil is quite a cute looking, slow moving beetle-like insect but is anything but cute! Nematodes are available to control vine weevil infestations and you can also buy compost that has been ready-treated against this pest. Vine weevils are especially likely to be a problem with plants that have been grown in pots and containers, and they are also attack many other types of plant, such as Geums, Heuchera and some shrubs.
So there we have it – a guide to strawberry cultivation based on 30 years of trial, error and experience! I hope you have found it of use and hopefully an inspiration too. I am always happy to advise on any aspects of strawberry growing, if you have any questions e-mail me.