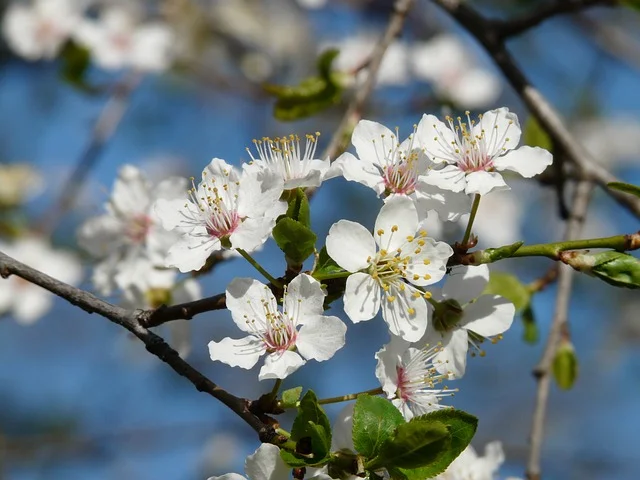
Plum pollination explained
When your new Plum trees come into blossom it might be assumed that a good crop will follow. Hopefully that will be the case but unless you have taken some guidance on variety selection, or done some homework you might be disappointed because of the issue of pollination.
View top quality Plum trees for sale.
Not all fruit trees are capable of setting a good crop on their own and require a partner – of a different variety – to cross fertilise and set fruit. Plums and Gages are no different in this respect, although it is slightly less of a minefield than with, say, apples or pears. There is certainly a greater range of self fertile varieties and it is important to choose on of these if you can only grow one tree. Many other varieties of Plum and Gage are at least partly self fertile, that is to say they will produce some fruits most years on their own, but may never show their full potential or really ‘shine’ Still others are full self-incompatible.
If you have ever had a plum tree in your garden that has consistently failed to produce good crops then it is likely that inadequate pollination was to blame. So before making your purchase check to make sure that you have a good pairing or that the variety[s] are self fertile on their own. A good fruit nursery can guide you through this and the best fruit-tree websites will give full information on which pollinating partners are required.
Plums, Gages and Damsons will cross-fertilise one another, as long as the variety pairing is right.
The best time to plant Plum & Gage trees
The less experienced gardener might be surprised to learn that when it is cold, frosty at nights and all in the garden is dormant is actually the best time to plant Plum trees! Because the trees are dormant at this time – from late October to March – they are able to be transplanted with minimal shock and aftercare. Frost does no harm to the trees once they are in the ground again and because they have been liften from nursery fields out in the open they are well hardened and impervious to frost and snow. They will sit in their new home and await the Spring when they will shoot forth once more.
If you are a fair-weather gardener, or suddenly been bitten by the bug to plant plum trees and it happens to be the summer time then don’t despair. These days planting can take place at any time thanks to that wonderful invention called the container. It allows trees to be re-planted without too much disturbance and provided you’re willing to put the work in afterwards by way of lashings of water daily for a few weeks then it is certainly acceptable to plant right through the growing season. The trees will usually establish quite quickly at this time and you will have gained a few months advantage compared to waiting for the winter to plant as by then your new trees will have been in the ground and growing for quite some time.
If there is a choice then an expert will always promote the autumn and winter time as the best time to plant fruit trees and this includes plums and gages. The only time a container grown tree planted during the growing season is to be preferred is if the situation is very exposed or ‘difficult’
Planting – preparation and Plum tree fertlizer
Planting and pruning are identical to the instructions given for cherry trees.The soil should be in a fairly friable state and well dug over before planting with an application of blood fish and bone, bonemeal a well balanced NPK fertilizer or growmore. If planting in grass then circles of 18” across should have been removed for each tree and a hole of 18-24” dug and replaced with well friable soil mixed with some fertilizer, since the ground beneath grass is often quite compacted. It is best, but not essential, if the soil is prepared some weeks in advance of planting.
To plant dig a hole that is large enough to take the roots or rootball without cramping, first drive in the stake [2 x 2” with a length of 48” is normally sufficient] place the tree in the hole so that the uppermost roots are covered by about 2” of soil. Infill with good friable soil and firm very well. It is important that no air pockets are left below the soil around the roots. Make sure the soil where you have planted is level with the surrounding ground and that there isn’t a low where water might collect as no newly planted tree likes to sit in water. When you are satisfied water the new tree in – copiously with a bucket or hose if it as pot grown tree, or just enough to settle the soil around the roots if it is a bare rooted one.
Container grown trees will require watering in the early morning and evening for the first few days following planting and thereafter once a day for 3-4 weeks until established. Bare root trees should not need watering again unless they become stressed after leafing in the Spring.
Pruning
One of the most important aspects in influencing the quantity and quality of the crop is that of pruning. Although the subject might seem daunting at first, I often feel that to prune badly is preferred to not pruning at all – especially with cherries that can show uncontrolled vigour quite quickly if not curbed. To have a tree growing in such a way is not necessarily a good thing as cropping will be delayed. One of the reasons for pruning all fruit trees is to promote the kind of growth that actually bears the fruit – not all growth does this. So to allow your trees to grow merrily away with no intervention not only promotes a poorly shaped tree, you might be waiting forever for a crop, or at best only get a few fruits. There are of course different pruning methods for bush, column, and fan trees.
The bush tree
Is the most commonly cultivated tree form. Regardless of whether your trees are on colt, a vigorous stock, or on a dwarfing one the principles are the same, but with the dwarfing trees you will have less growth to deal with.All pruning should be done in the Spring or early Summer, to avoid infection of silver leaf disease. But winter pruning can be unavoidable in some circumstances. If silver leaf has been a problem locally then paint main cuts with arbrex or similar.Plums and cherries can both be grown in a natural shape with very little pruning. Leave the tree almost entirely un-pruned until it settles down to fruiting, just remove the odd branches that re overcrowding the tree, if any. If you require more laterals that are produced naturally, simply shorten some of the side shoots, In later years just prune to keep the tree tidy, preferably in Summer (July).
The Dwarf Pyramid
This is by far the best trained form for plums and cherries if you require your tree to remain an easily manageable size. Plums can even be grown in a fruit cage using this method and all trees are easily netted from birds, which is very important with cherries. After planting the tree it can be left until the Spring and as growth starts the main stem should be cut back to 4 feet from ground level. This may have been done at the nursery before despatch. During the Summer, usually in late July, all of the new side branches should be shortened to about 8 inches, pruning to a downward pointing bud, the leader (main stem) should be left un-pruned. If the side shoots appear too close together, remove some completely to leave a well shaped tree. All shoots below 18 inches from the ground should be completely cut off.
Following Spring & future seasons
As growth starts in the Spring, the leader should be cut back by about half to two thirds of the new growth, pruning to a bud the opposite side to the previous year’s pruning. In future years when the tree has reached the required height of 8-9 ft the leader should be cut back in May to control at this height. In Summer each year all of the current season’s growth of each branch should be shortened to about 8 leaves, all laterals growing from these branches should be pruned to 6 leaves, any vigorous shoots near the top of the tree should be cut out.Your tree is now maintained in an easy to manage heavy cropping form
The fan trained Plum tree
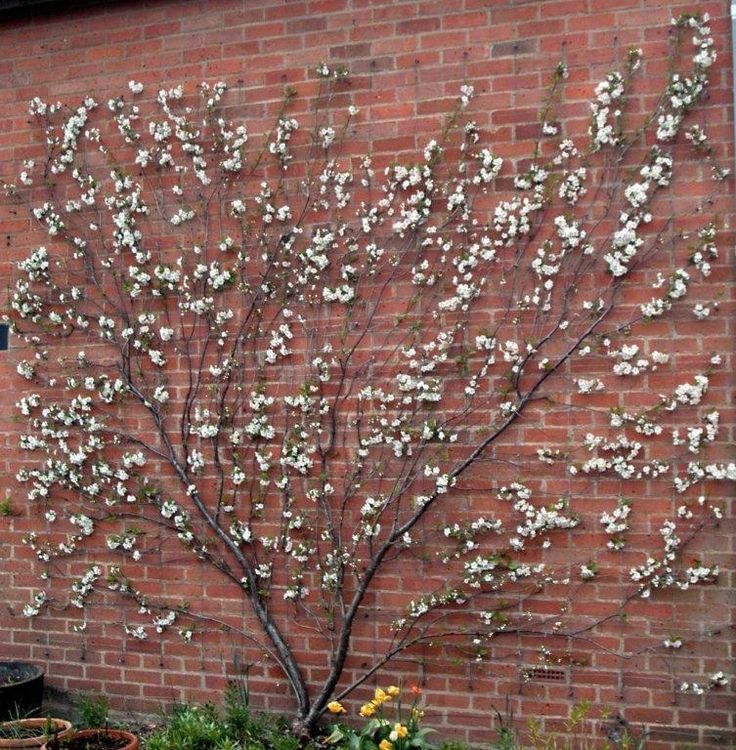
Start with a young year old tree and immediately remove the top third of the growth. If it is feathered [i.e. has side laterals] prune just above two conveniently placed branches; these will form the basis of your fan. Normally this is about 18” from the ground but it will depend on the positioning of 2 good feathers [branches] which you can use. It can also be varied to your own preferences and there are not hard and fast rules as to where the first branches should be – sometimes a fan will be grown with a short leg and other times it may be branched quite close to the ground. If your trees is an unfeathered maiden and does not yet have side shoots then prune to just above 2 good opposite buds and these will form your first laterals from which to work.
The first Spring shorten these two laterals to about 10-12”. You will now have a tree that looks a bit like a stumpy capital ‘T’ but don’t worry. This is a good basis from which your fan will develop. These two shortened side laterals will now produce several new upwardly mobile leaders during the course of the growing season. Leave them be until the next Spring and then stand back and survey your tree. Most of the work will now have been done but you will need to remove any new growths that are heading towards the wall or fence and any that are crossing or too congested. Having done this you should now have a nicely balanced tree – confratulations, your fan shaped tree has been trained!
Later that summer, and in subsequent summers, you can shorten again a selection of less importasnt laterals and you can also trim the top most growths so that the tree stays within the boundaries of your wall or fence. Finally, in Autumn of the same year trim again the laterals that you shortened earlier in the summer, to about 3 pairs of leaves. You will find fruit buds will form on these shortened branches to carry next years crop.
The columnar Plum tree
Is the easiest growing method to prune. Pruning takes place in the second half of the summer and is simply a matter of trimming back all of the side growths to about 3”. Established trees only need to be pruned once a year but young trees show more vigour and you may need to go over them again in late Autumn. In subsequent years the practice is continued late each summer. Flower buds form on the base of the previous years growth. The leader can be shortened once a year, at the same time, if desired and to keep it within an acceptable height. This promotes better branching lower down and a new leader will form from a bud just below where you cut.
If your tree has any bald patches along the trunk, which can happen especially lower down, you can encourage dormant buds to shoot by nicking the bark with a sharp knife just above the bud. This often encourages them to shoot.
General aftercare
Feeding – a regular source of food is essential to the well-being of your plum trees and in order to gain the best crops of quality fruit it is important to apply the correct type of feed at the right time. Fertilisers high in nitrogen can be used when the trees are young as this promotes growth, which is what you want in order to build a good framework of branches. But once the trees are established high nitrogen fertilizer should generally be avoided because you no longer want to promote lots of lush leafy growth at the expense of flowers and fruit. So, from year 3 I recommend either bonemeal/growmore or a similar balanced fertilizer which should spread over the soil immediately around the tree at a rate of 4oz’s per square yeard. Late winter or early spring is a good time to do this. Then, about a month later provide a further application with sulphate of ammonia, this time at just 1oz per square yard. This should provide all your trees need for the season.
If your trees are very dwarfing and easy to manage then you might want to apply foliar feeds instead – maxicrop, a seaweed extract, is ideal. I like using this type of feed because you can almost see the foliage turn a lush green within hours of applying it [maybe it’s imagination I don’t know!] and it certainly encourages good results. But it is impractical on larger trees and there is also the downside that it really needs applying fortnightly during the main growing season for the best results which can be a bit of a chore.
Thinning of the fruits
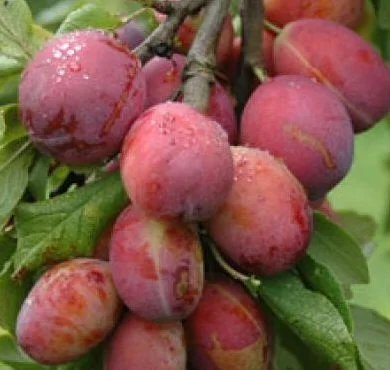
This is a good practice if you prefer larger fruits and also discourages the natural process of fruit drop which will occur at some point before the fruits reach maturity. It’s not an essential if you don’t mind fruits of all sizes but if you want a really impressive yield of class 1 fruits then go through the fruit trusses when the fruits themselves are about the size of a small marble and thin so that you leave them about 3” apart.
Harvesting
You will need to go over your trees more than once – you can’t pick all the fruits at the same time as they won’t all ripen at once. This is a good thing of course. Usually 3 harvests are necessary on established trees. Don’t pick until the first fruits part readily from the branch – a few dropping to the floor is a good sign as it means that the first ones are fully ripe. Never try to force the fruits to part – if they won’t come reasonably easily then they aren’t fully ripe. If you try to pick too early they may be tart or the flavour may not have developed fully. And always try to leave a few on the floor for hungry Red Admiral and Comma butterflies that love feeding from over-ripe fruits – an important energy store for hibernation.