Choosing What to grow
These days there seems to be such an ever-increasing range of delicious fruit plants for the garden and allotment that it can be a bit bewildering perhaps to the first time gardener – especially if, as is so often the case, space is at a premium – what exactly should you devote your efforts to growing? Breeding stations around the world have been busy developing ever more selections, varieties and types to choose from which of course is a good thing as many of them have distinct and attractive qualities, and may be advancements over older varieties that have gone before; but it can also make choosing even more confusing!
Choose From the Widest Range of Delicious Fruit Plants & Bushes for Sale
Probably the first thing you should do is draw up a workable plan, a list of which types of fruit you would get the most benefit from. There are some important questions you should ask when determining which fruit plants will bring the most value to you and your family.
Do you have a large freezer? Do you cook and make jam?
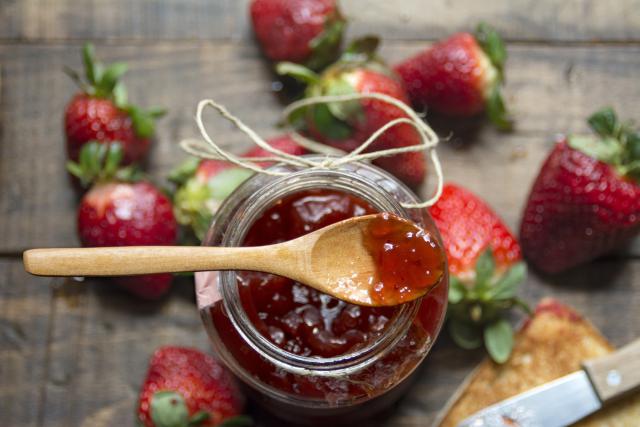
During years of excess, those banner summers when conditions are perfect and your fruit plants and bushes all yield to their utmost potential, can result in an overload of produce; are you likely to freeze this excess and do you have the facilities? If the answer is no then you might restrict your endeavours to smaller quantities and it’s also worth remembering to avoid those types that are primarily used for cooking purposes and for which freezing is the ideal way of preserving for future use. If you and your family just like eating fresh for tea with cream for example, or eating them outdoors straight from the bush or plant, then you won’t want rows of culinary gooseberries, a nice big rhubarb clump or blackcurrants for that matter.
Do you have children?
If you have children that you’d like to enjoy these fruits of your endeavours then make sure to choose extra sweet dessert types that they can enjoy without sugar and without the need to cook and preserve.
What about holidays?
This is often an important consideration; if you habitually take your summer break in July then it’s wise to make sure you grow types of fruit, and varieties that come early or late because there’s nothing worse than coming back from your trip to a garden full of spoilt or over-ripe fruit. These days there is plenty of variety so you can easily choose types that fruit outside of your away-dates, and the same is true whether you holiday in June, July, August or September – there’s a good range that crops at different periods during the summer and these are easily selected with the information that we give in the main category sections of our website.
What type of soil do you have?
Your soil type matters too, as does the amount of time you are willing or able to devote to them. For example, if you have a heavy soil you might want to avoid raspberries that traditionally do not thrive there. Rhubarb, blackcurrants and gooseberries however will thrive, as will blackberries. If the soil is at the other extreme – light and sandy – then your good to go with raspberries and strawberries in particular. Of course, good soil preparation and improvement can help you to grow most things no matter what the soil type but again it depends how much time you can give to your fruit growing endeavours too. Simpler lower maintenance crops such as blackcurrants, blackberries, rhubarb and redcurrants come to the fore for gardeners with limited time as these tend to be lower maintenance and can do well even with a little neglect.
Siting is also of primary importance
If it is an open, sunny site then just about anything can be grown; if it tends to be a bit shadier then avoid sun-lovers like strawberries – concentrate instead on growing fruit plants for shade such as blackcurrants, gooseberry and blackberry or maybe rhubarb. And space too is vitally important. Smaller areas can grow good crops of strawberries and cordon trained currants and gooseberry but raspberries will very quickly swamp smaller areas, or you may be able to plant too few to make it viable. Blackberries too demand much more space than you may be able to afford; that said read on and this article will give you spacer-saving ideas for all.
So, armed with this checklist – that of usage, space, soil type, ease of cultivation and cropping period – you can make the ideal shopping list that meets your criteria and needs.
The Complete Fruit Plants Guide by Type
Strawberries
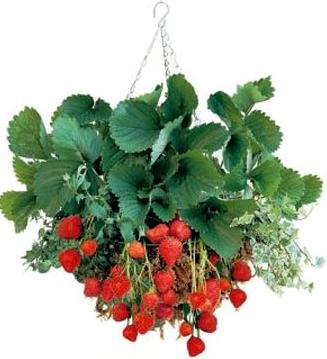
Strawberries are the smallest of all the fruiting plants you can grow so are easily accommodated even in restricted areas and smaller plots. The plants are semi-herbaceous, meaning that they die back in the winter; this is at odds with virtually all the other soft fruit plants which maintain a woody framework even in winter time. A strawberry plant seldom grows more than about 12” and the same across, different varieties can be a little more or less vigorous than this but that’s a good average. A strawberry plant can be cropped successfully for 3-5 years, after this period it’s a good idea to discard them and start again as disease will start to build up and the plants begin to lack vigour. A strawberry plant bears clusters of white flowers during May and also produces lots of baby plants by way of ‘runners’ – these usually start to appear after the fruits ripen, later in Summer. These runners can be a good source of new plants but can also be a nuisance so if you don’t want to propagate from them, remove them as they appear or the rows will quickly begin to look untidy.
Strawberry plants can crop at any time from late May to the first frosts, so called maincrop varieties cover the traditional summer period and then perpetual or autumn fruiting varieties take over and fruit in flushes to the first frosts. By planting a selection of varieties you can ideally cover this entire period.
Yield
Established plants carry 2-3ibs per plant according to variety as long as they are well looked after and not too old. Remember yield deteriorates after 3 years so then it may be necessary to replace them.
Soil Preparation & Planting
Is explained in our Strawberries planting guide.
Planting distance for strawberry plants
You will need 12-15” between plants and about 36” between rows.
When to plant
Actually you can plant at almost any time of year – pot grown plants can usually be acquired from Spring through to the Autumn and specialist nurseries will supply bare rooted runners from October to March. Our preference is always for a pot grown plant and if these are planted during the summer – July to September ideally – then you can rely on virtually a full crop the following summer! But bare root runners are easy to plant and need little watering then, plus they coincide with the dormant season planting of all the other soft fruit plants such as raspberry, currant, rhubarb etc so it is often convenient to plant everything at once and have it delivered at the same time. Runners planted over winter will produce a crop the next Summer although it won’t be as heavy as with the pot grown summer planted ones.
Growing strawberries in pots
Growing strawberries in pots is easy! Strawberries are probably the most accommodating of all our delicious fruiting plants for container growing, they’re naturally smaller growth lends them to all sorts of container, be it a good 12” pot, a hanging basket, a trough, growbags, or you can buy proprietary strawberry planter which will have several holes in a tower system. The key is to not overcrowd – I’d recommend no more than 5 plants in a 12 “ pot or 4n in a 24” windowbox. Peat-based compost is much the best and I know that’s a dirty word these days, you can for coir but it will need more watering and more regular feeding. All varieties of strawberry can be grown in pots but it makes sense to go for the more compact kinds and also those with a longer season – autumn fruiting and perpetual varieties are the obvious choice in both those respects. Diamante, a very compact long fruiting selection from California does particularly well, as does Flamenco, Calypso and Rabunda, this latter variety is an oldie I have a soft spot for! Strawberries in pots should only be cropped for one season and then discarded or planted out in the garden. You can keep them on the patio, the cold greenhouse or set them amongst the flowers in the border, just make sure they never go short of water otherwise the fruits will be small and tough. It’s surprising just how much water they can get through and it’s wise to get into a routine whereby you water at the same time each morning or evening. Feeding – I like to use Seaweed extract as a foliar feed, it’s fast acting and gives the plants a good colour too but there are lots of other general purpose feeds out there that wortk well too.
Propagation
Strawberries are very simple to increase, they obligingly produce these little runners from the parent plant, small immature juvenile plants that appear on long leafless stems in late Summer. If left to their own devices they will root into the soil wherever they lay; you can then go along and lift them with a trowel in late Autumn, when they have established a good root system, and re-plant them where needed. You should never take runners from plants older than 3-4 years, nor from any that lack vigour or show signs of disease. You can also take immature runners and root them in pots in a cloche or greenhouseeven if they have no roots of their own, snip off the end with the plant with about an inch of stem attached and insrert into pots of multi purpose compost; no rooting agent is necessary but you should cover the pots with polythene to stop dehydration. Even the ‘tips’ [as they are known in the trade] will produce roots even if they have none, as long as they have developed a heal or kink in the stem just before the plant; if the stem is flat and hasn’t developed a heal then they won’t root.
Some perpetual, Autumn fruiting, and day-neutral varieties produce much fewer runners than maincrop varieties, sometimes none at all so it can be difficult finding runners to increase or replace your stock. In this case there is a second method of reproduction and that is careful division of the parent plant. This isn’t a well known technique but it can work well when performed carefully after fruiting is finished, in Autumn or even a little earlier as long as you don’t mind sacrificing the last of the crop. 2 year old plants best suit this purpose. Gently lift the parent plant with as much root as possible, shake off the soil and then wash it under the garden tap so you can see the crown of the plant properly. Cut back the foliage to just five or six inches from the crown of the plant. You should then see the established mother plant is actually made up with several smaller plants all joined together at the base. Trim back all roots to about three or four inches, and, taking a sharp knife divide it up into small individual plants, cutting through the woody material where necessary. These new plants should be set into individual pots of general purpose compost at a depth so the soil is level with the base of the crown. Firm and water in well, they will root through in a sheltered place outdoors but for faster establishment keep them in a cloche or cold frame or cold greenhouse. Plant out in their final positions next Spring.
Some strains of seed raised Strawberry have come on to the market, they are definitely inferior to traditional varieties raised vegetatively and the seed is quite expensive and very tiny which makes it tricky to raise in the early stages. But this method can yield useful plants that will crop the second summer after sowing. Saving seed from your own strawberries will not result in plants identical to the source, and they will be of variable quality yet it can be an enjoyable experiment if you don’t mind the lottery of an unpredictable result! The fruits intended for seed production should first be dried out on kitchen towelling on a sunny windowsill; after 2-3 weeks rub the skin through a sieve of extract the seeds individually with a needle. Sow on the surface of moist compost and germinate in a propagator, out of the sunshine, at a temperature of about 70 degrees. Prick out into individual pots 3-4 weeks later.
Space saving options for strawberry plants
They’re pretty easy to tuck into odd spare places and can grow anywhere there is some decent soil and sunshine for at least 4 hours a day. As they are quick to come into bearing they can also be used as a catch crop in a fallow area awaiting something else, or you can grow them in rows between newly planted raspberry canes, as long as they are discarded the second year once the raspberries start to get going. They are, as previously described, ideal for container gardening – why not try some hanging baskets, they look lovely – just as attractive in their own way as more traditional fare, and yet productive too! Strawberries can also be grown at the base of rose bushes or shrubs in the border, as long as they can get some sunshine they will perform well.
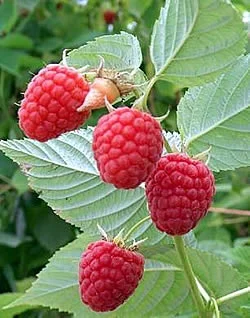
Raspberries
Raspberries grow from stout individual canes which can grow 4-7’ in height, and they spread beneath the ground from the roots which send up new canes a few inches away from the parent cane, creating in time stands of several canes from one plant [known as a ‘stool’] Raspberries are entirely deciduous, in that they will lose their leaves in winter. Most canes have spines or bristles, some newer types have smooth canes. Flowering takes place in late May and June with greenish white flowers produced in clusters from short side laterals set along the top half of the cane. The canes will have a good productive life of around ten years; after this point they should be dug up and replaced with fresh disease free canes in anew area. The site of the old raspberry bed can safely be a home to unrelated fruits such as currants, strawberries or rhubarb as long as it has been improved and fed well beforehand.
Cropping period
You can have raspberries in fruit from late June to August from what is known as floricane or maincrop varieties, that fruit on second year canes. Autumn fruiting varieties, now known as Primocane, fruit from August to October and bear their fruits on new canes of the current year. So with a considered range of varieties you can harvest fresh raspberries from late June to mid-October or sometimes even later if the weather stays warm.
Expected Yield
You can get about 1ib of fruit from one cane and it’s parents, when established, from an older variety. The best modern types can yield almost double this.
Planting distance
Allow 1’ [30cm’s] between canes, but you will need six times that between rows as the canes spread out, making dense stands, and you need to allow room to walk between the rows for maintenance and harvesting.
Soil Preparation & Planting
Raspberries really need a good welld rained soil; heavy clay soils are often unsuitable unless improved. Soils of this nature, or poorer soil in general, will benefit from growing one of the older varieties such as Glen Clova or Malling Promise; these tend to have more vigour and more tolerance.
After planting the canes of maicnrop varieties must be cut back to 2″ above ground. This promotes basal and below ground growth which will fruit the next season. the ‘old’ cane you have planted may be reluctant to grow well and may also be tempted to fruit the same season, which is a definite no-no.
Further information on planting raspberry canes can be found in our Raspberry Canes Soil Preparation and Planting Guide
When to plant Raspberries
October to March is definitely the best time, even during the depths of winter is fine as long as the soil is open and workable; frost does not harm the canes once they are in the ground. Many folk like to plant in Autumn when the soil still holds some warmth, so that the canes are settled and partly established before winter sets in. Later planting in March and April can necessitate the need for watering the first Spring if it is a dry one until the new growths are established. You can buy raspberry plants in plugs or small pots and these can be planted through the Summer, if for some reason this is more convenient to you then ok, but results are generally less satisfactory than planting a bare root cane during the dormant season. Prices are usually roughly the same whichever form you buy them in.
Space saving option for growing Raspberries
Raspberries can take a lot of room it has to be said; they are tall and they do tend to spread around, yet curbing the new canes results in loss of crop. One thing you can do is to plant 3 or 5 canes close together and tie the new growths together ‘wigwam’ style in the second season. This forms a nice self contained clump that can happily yield in an area of about 24” x 24” and it won’t need support as the canes will support one another. When new canes start to stray away from the areas hoe them up carefully. Some more compact varieties that don’t grow so tall and are a little less enthusiastic in their growth are Malling Jewel, Lloyd George, Zeva, Malling Admiral and September. These mostly older varieties can also be grown as self-supporting, without the need for posts and wires and they have a really good taste too.
Container growing raspberries
You might get some initial success planting raspberries in buckets of well drained fertile compost but long term they don’t do well and I would view this either as an experiment or a short term project only. The parent cane’s ability to produce productive new canes is compromised by lack of space and as the older canes die out or are cut away you are left with a lack of young productive growth and it’s difficult to rejuvenate.
Propagation
This is done entirely by lifting of new canes which are produced naturally by the parent. Established new canes can be carefully lifted from the parent at any time October-March and re planted straight away. The thickness of the cane is not too important as long as there is a reasonable root. The canes should be cut right back after planting. Only take the canes from vigorously growing healthy stocks. Cuttings from raspberries are difficult although shoot tips have been rooted successfully under cover with mist and bottom heat but generally require a specialist propagation unit.
Blackberries
Blackberries are easy to grow on most soil types and produce long, arching stems which generally require the support of a fence, wall or post and wire system. There are a few more compact varieties that can be grown largely self supporting and have a slightly more shrubby habit. Many of the older varieties have ample thorns but there are plenty of smooth varieties that are free of prickles as well. The flowers are white or pinkish white and appear in June. The fruit is very versatile, ideal for eating fresh straight from the plant, or served in a bowl with cream for tea, but also a wonderful thing for the kitchen cook used in jams, crumbles, pies and pastries or used for juicing in smoothies; freezes very well.
Spacing
For traditional varieties you need at least 10’ for one plant. Intermediate growers such as Helen and Loch Tay etc 6-8’ is sufficient. Compact growers – Loch Ness and Waldo primarily – 4-6’ is enough.
Yield
This is a question with a variable answer! Some of the more boisterous growers like Bedford Giant or Himalayan Giant can give up to 30ibs per plant – that’s a lot of blackberries! Most will give up to 20ibs when fully established; the smaller types 10-12ib is usual. Blackberries do not reach full potential for about 4 years and usually start to crop from year two.
The blackberry season
The blackberry season starts at the end of July with Helen and other early varieties, usually, peaks throughout August with the main run of cultivars, and can continue well into September with the addition of later varieties like Chester.
Soil Perparation & Planting
Soil Perparation & Planting can be read about in our Blackberries planting and aftercare guide.
Siting
Although the largest, sweetest berries will come from those plants growing in a sunny spot, this is one fruiting plant that can cope with some shade as long as the soil is good. They can be used to utlize a North or East wall which is a good aspect for little else! Wherever they are grown they will need some support otherwise the long arching canes will be difficult to handle and pick and the fruit will be on the floor. If they aren’t kept regularly tied and pruned they can quickly become an unruly mess.
The Best Time to Plant
Blackberries are mostly supplied in containers so there isn’t really a planting season as such, as long as they are in pots you can put them in at any time but the most popular time remains in the Autumn and winter, the benefit being that little or no watering is needed and the plants establish with little stress, growing away in the Spring. When planting during the growing season make sure provision is made for regular watering until established. Planting during this period does have advantages in colder areas in that the plants will be largely established before their first winter.
Space Saving Options for Blackberries
As previously mentioned, there are some good compact growers like Waldo and Loch Ness. It has been suggested that these two varieties can be tucked into a row of raspberries, or grown on one end, just 4’ is enough for them to grow. They can even be cultivated in large containers using a good hearty compost and a regular feed such as vitax or maxicrop seaweed extract. You could grow them at the back of the shrubbery since no support is required and they can take a bit of shade. Another option with the more vigorous traditional varieties is to restrain their growth to one stout post; limit the number of new canes that are produced and tie them in to the post.
Remember the more vigorous varieties can be grown over or through a hedge as they would in the wild. Varieties like Bedford Giant or Ashton Cross are well suited to this use. The Himalayan Giant – as the name would suggest, the biggest, most rampant of all, can be grown through a large tree or over an unsightly outbuilding.
Propagation
The easiest way to propagate a Blackberry is by rooting the tips of strong new canes during late Summer. Select the strongest and peg the tip down onto the floor with a wire hoop and scoop some soil onto it. Water it gently in and, if the weather is dry, water again each week until a new shoot emerges from the soil in the Autumn. At this point it will have rooted so the old stem can be cut away and the new plant will grow away on it’s own; it can be dug up and re planted where required that winter or the following early spring. You may find seedling popping up around the parent plant from time to time – or anywhere in the garden for thast matter, and although it might be tempting to utilize them, it’s a bit of a fools errand. They are invariably thorny [even if the parent plant is thornless] and super-vigorous and nine out of ten of them will produce fruits of poor quality so they are best ruthlessly dealt with and hoed.
Another propagation method, and the one used by commercial nurseries, is to take tip cuttings or leaf bud cuttings, which contain simply the leaf and a short length of stem about half an inch in length each side of the leaf – taken from the middle third of strongly growing shoots in July or August. They must be rooted under plastic with adequate humidity, bottom heat helps. Rooting usually takes place in three to four weeks but the plants must be grown on until the following summer before being planted out properly.
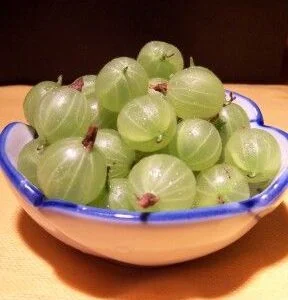
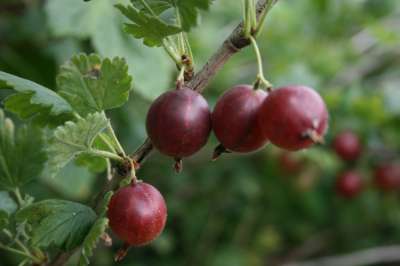
Gooseberries
A real old traditional fruit if ever there was and the one most likely to conjure up nostalgic memories! Fortunately, many of those old varieties still exist so you can still grow that old treasured heirloom from your childhood days! Modern varieties are better, of course, and often have resistance to mildew which can be the scourge of many gooseberry crops
Gooseberries grow as upright to semi spreading twiggy dense bushes, they tend to have quite small root systems and are deciduous. The very small bell flowers appear early, at the start of May and maybe even before, and the bushes come into leaf sooner than just about anything else does in a mass of vibrant green. Unfortunately, the attraction ends their because these densely thorny ugly bushes are quite unsightly! The berries are mature in June and as soon as they have finished fruiting the leaves tend to go copper or discoloured and often the bush is bald completely by the end of summer; this isn’t something to worry about and they invariably leaf again, eager to get going next March!
The berries can be a traditional green, which are the kind used for culinary purposes, such as jams, crumbles, pies, freezing, stewing and bottling, or yellow or red. These two latter types are sweeter and can be used for eating fresh, even straight from the bush when fully ripe. The dessert kinds seem to be increasing in popularity every year but you can’t really beat a wonderful gooseberry pie or a jar of emerald green gooseberry jam and for that you need a true cooking variety like Careless, or Greenfinch and Invicta.
Although the majority of Gooseberries are stoutly thorned mention must be made of a small number of thornfree or nearly thornfree varieties all of which are red fruited at present. Captivator, a continental variety was the first of these to come to prominence in the 1970,s, Pax came along quite recently and is a better variety with an excellent flavour and with some mildew resistance but needs protection in colder areas. Freedonia is another newer one that shows promise.
Gooseberries are in the main very frost hardy and the flowers seldom get frosted either, ensuring a reliable crop each year. They can even cope with some shade and still do well, or be grown against an East wall. Mildew is the one scourge to be aware of, grow mildew resistant varieties such as Invocta [green] Greenfinch, Jubilee [yellow] the continental ‘Hino’ prefix varieties, or Martlet [red] and Rokula [red] These are all superb varieties. The older types will mostly need help in remaining free of Mildew with a comprehensive fungicidal spray programme.
Spacing
Bush Gooseberries should eb set about 5’ apart – vigour does vary with variety, some of the very old ones seem reluctant to grow much but others, especially newer varieties or tried and tested commercial ones, grow with more vigour. Cordon gooseberries should be planted 15-18” apart.
Soil preparation, planting and pruning
Soil preparation, planting and pruning are described in an earlier article which you can read here.
Yield
So, how much to expect from your Gooseberry bush? They are generally quite precocious and will generally give a few fruits even the first Summer following planting; when at their peak a good variety can give 10ibs of fruit from one bush, older heirloom varieties less. Cordons can give 1-2ibs but take up much less room.
When to harvest
June is Gooseberry time; if you are cooking with them you can pick them as soon as they have reached a decent size and ripeness isn’t so much of an issue. However if you want to eat them fresh don’t be tempted to pick them too soon as they colour up for a few days before attaining full ripeness. The first fallen berries on the floor, and a little ‘give’ when gently squeezed are signs that the crop is ripe, although also remember that all the berries might not ripen evenly over the bush so it’s often necessary to go over it two or even three times. Cordon and wall trained Gooseberries will ripen earlier than bushes.
Gooseberries in pots
They can do well in a container of about 5 litres – as mentioned before they tend to have small roots so it’s no use offering them something more generous as the compost will just stagnate. Use a hearty loam based compost with some added perlite. They can yield well for up to 5 years, after that plant out in the garden and start again. Be prepared for especially early dormancy with Gooseberries grown in containers, this doesn’t particularly signify a problem.
Space Saving Options
There are a couple of ways in which you can incorporate Gooseberries into smaller spaces. The cordon is the most obvious way and it’s quite easy too. The plants are restricted to just one [single] or two [double] stems and the berries appear directly from these growths all along the stem. They can be spaced only 15” apart and must be supported – either with a post and wire system if you want to grow several, which is easy enough given the limited requirement of space, or you can plant against a wall – even an East facing wall is suitable – or sole cordons can be adequately supported with a stout bamboo cane.
The second way in which you can grow Gooseberries in a restricted space is as a standard. With a standard the gooseberry ‘bush’ has been grafted onto a clear standard stem, a bit like a standard rose. This allows for planting beneath with annuals or herb maybe, nothing too big and boisterous but smaller growing plants are fine. They are easier to harvest as the berries are roughly at eye level and they take up less room. You can grow all the types this way although you will have to go to a specialist fruit growing nursery to buy one. They can also be grown in containers. A standard gooseberry will need it’s main stem supporting with a good stout bamboo cane. m
Propagation
Gooseberries are simply propagated by hardwood cuttings taken during the winter; there is no other reliable method. Mature growths from the previous season, about 6” long are inserted into friable soil, buried up to a third their length any time from October to February. These invariably root and are ready for transplanting as year old plants to their final positions the following Autumn or Winter.
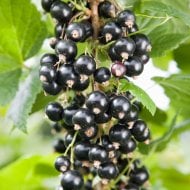
Blackcurrants
Buy quality blackcurrant bushes here.
The delicious unmistakable aroma of the blackcurrant is an essential part of any fruit growing plot. Of the easiest cultivation and relatively undemanding, blackcurrants make upright growing bushes which can reach up to 4-5’ in height and the same spread. They fruit on second year wood so a proportion of all the old stems must be cut back each winter to allow and promote new shoots from the base which carry the fruit the next year. Older stems which have been left tend to lose productivity. The flowers appear in May [beloved of bees!] and are self fertile.
The Scottish ‘Ben’ raised varieties are really the best for garden cultivation as they have good frost resistance and tend to be heavy croppers. Some of the older varieties remain worth growing such as the once commercially grown Baldwin or Wellington XXX but these can on occasion catch the frost with their flowers which limits the crop so are a bit more unreliable.
Blackcurrants are of course used predominantly in cooking – jams, pies, juicing and they freeze really well too– but generally aren’t really suitable for eating fresh….. except for a recent variety called ‘Ebony’ which has a milder sweeter flavour and can be eaten without cooking so is well worth looking out for if you fancy this new way of enjoying Blackcurrants!
Blackcurrants also have the advantage that they are much less attracrtive to birds and seldom eaten by them.
Planting distance & siting
These robust bushes need not less than 5’ or 1.5 metres between them. They will accept some shade and still crop well but an open sunny position brings about best results. Just about any soil is suitable avoiding the very dry or perpetually waterlogged!
Soil preparation and planting
Soil preparation and planting can be read about in our earlier article Growing blackcurrants guide.
When to harvest
The main Blackcurrant season is in July but make sure you don’t pick them too early because the fruit generally turns colour at least a week before it’s really ready and full aromatic aroma and juiciness develops fully in those last few days. There are one or two later varieties that ripen into August such as Ben Alder.
When to plant
You may plant at any time, but the best period remains the traditional dormant time which is October March. At this time you will be planting bare root bushes and these establish easily with little check or shock and romp away the following Spring. But you can also plant during the summer too as pot grown specimens are readily available of both red and white currant. Planting at this time requires regular and heavy watering afterward but the bushes will be well established before their first winter.
Yield
A good well established Blackcurrant bush will give you 10ibs even from an ordinary variety, the best modern ones, when at their peak, can give 12 ibs. Blackcurrant bushes can remain productive for 8-10 years. After this period the bushes often become diseased and will start to lack the vigour necessary tom produce to their maximum capabilities so it is best to remove them and re-plant. This should take place in fallow ground not previously used for currants; the original space you were using can be used for unrelated fruits such as raspberries or strawberries or blackberries.
Space saving options for Blackcurrants
Most of the general varieties are lets face it quite big and bushy andf simply need space; but there are a couple of options for those of you who don’t haveacres to play with. The first is a variety called ‘Ben Sarek’ which is handily much more accommodating in it’s growth, allowing for a planting distance of about 3.5’ – it has even been suggested it could be planted close together and allowed to form a ‘hedge’ This Scottish variety remains heavy cropping despite it’s stature and is frost resistant too. That’s probably why it’s the number one top selling Blackcurrant variety for us.
It is certainly possible to grow Blackcurrants in pots too, they can thrive there. The aforementioned Ben Sarek is the best variety but even the other varieties of normal size can crop well in a 10 litre container or larger, using a good hearty compost. After 4 years repot in fresh compost; watering is of course key especially as the fruits begin to swell; feeding can be provided with seaweed maxicrop applied as a foliar application during the growing season. The bushes are quite frost hardy during the winter so no protection should be necessary and this applies equally to those bushes growing in the ground; it is only when in blossom and you get one of those unexpected late frosts that you might need to throw some fleece over the bushes to avoid frost damage to the flowers but this is less necessary with the better modern Scottish varieties.
Blackcurrants can also be grown on a standard stem of 3.5’-4’ and this can fit handily into modern gardeners and even be grown in a large pot on the doorstep. Like the standard Gooseberries mentioned before, harvesting is easy and you can plant beneath the blackcurrant too for added garden space value.
We are sometimes asked for blackcurrant cordons which are a popular choice and successful for Gooseberry and other currants but this method of cultivation isn’t nearly as rewarding for blackcurrants due to the different pruning method required so is best discounted.
Propagation
Blackcurrants are very easy to multiply. Hardwood cuttings about 4” in length are taken from strong previous year’s growth and inserted directly into well cultivated ground during the winter time, October through February being a good time. By the Spring they should be well rooted and shooting strongly and will be ready for lifting and transferring to their final position the following Autumn or Winter. Softwood cuttings can also be taken during the Summer from fresh new growths and root relatively easily under cover with plastic or in a propagator; gentle bottom heat speeds rooting and increases the take.
Blackcurrants from seed produce very variable results so this is not a recommended method of increase; as with Blackberries, and sometimes Gooseberries and Redcurrants, Blackcurrants may self seed and it might be tempting to grow the seedling on but it is unlikely to be a good producer so unless you have a spare corner in which to let it grow it’s best discarded.
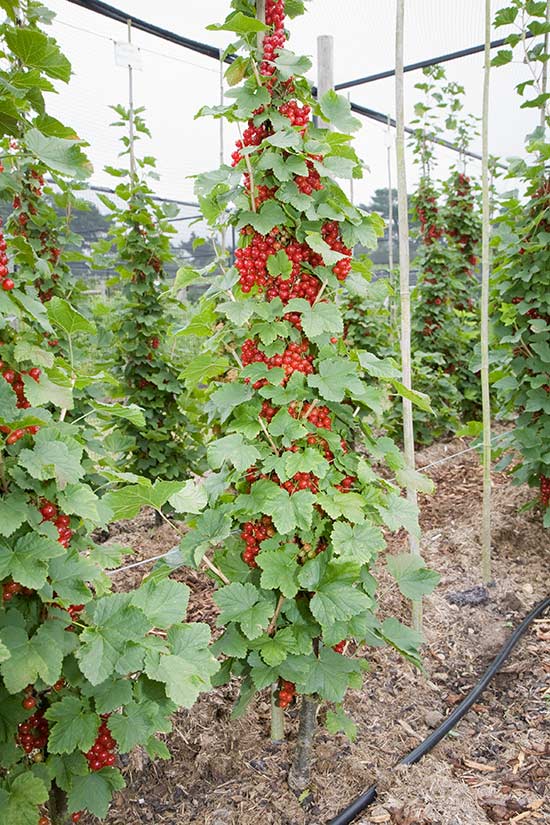
Redcurrants and Whitecurrants
Identical in their habits and requirements; redcurrants are often combined with raspberries in recipes, in jams, pies and puddings and of course for making redcurrant jelly, but also make a piquant and highly attractive addition to fruit salds, with those strings of brilliant red pearls gleaming….. Whitecurrants are altogether milder and sweeter, more suitable for eating fresh but they can also make a delicious pink coloured jelly and are well worth growing.
Red and white currants form upright bushy shrubs of maybe 5’ in height, they are deciduous and produce strings of strangely attractive bee-friendly greenish flowers in May.
Redcurrants are especially attractive to birds so to avoid losing part or all of your crop provision should be made to net the bushes as the berries begin to ripen; be warned the birds won’t wait until the crop is fully ripe before they appear so take care of this early on as soon as you see the first colour begin to appear on the bush. Whitecurrants can also be taken but seem to be less attractive no doubt owing to the less brilliant colouring of the berries.
Spacing
You will need 5-6’ for each bush for either redcurrant or whitecurrant. They require less pruning than Blackcurrants, this being confined to the removal of some older, non productive wood as required. They also lack the strongly aromatic resinous odour of the Blackcurrant.
Siting
An aspect in full sun is required, all ordinary soils are suitable as are improved clay and sandy types. Try to position out of strong winds for the branches on older specimens can become brittle.
Harvesting
The berries ripen during July with a few latecomers in August – look for Redcurrants Redpoll and Redstart or Whitecurrant Blanca. The Junifer redcurrant is the earliest variety and can sometimes be ready at the end of June.
Planting, pruning and soil preparation
See our earlier article on this,Redcurrants planting soil preparation.
Expected Yield
About 8ibs per bush is usual; up to 0.75ib’s for cordons.
Space saving options for Redcurrant and Whitecurrant
If you haven’t the room to devote to traditional bushes then you will be glad to here there are some smaller options available which makes the cultivation of these enjoyable fruits within the scope of all. A single cordon, for example, needs just 15” in which to grow and can be trained upwards to a height of 4’ or a little more if required. It’s a very simple system and productive too; you could theoretically incorporate three different varieties into a length of just 4’and enjoy a range of delicious berries during the Summer. Cordon trained currants will require support, a fence or wall, or can be supported with a stout bamboo cane; or you can plant a row and tie them to a post and wire support system.
Wall training needn’t be restricted to the cordon training method; did you know you can actually fan train both Red and Whitecurrants? This is a most attractive feature for any sunny wall and yields of 10ib’s plus are normal. Easier to net against the birds, you will need a space of about 6’ width and preferably the same in height.
Our Redcurrant bushes & cordons
Red and whitecurrants can also be grown on a standard stem which can be advantageous in today’s smaller gardens, taking advantage of the vertical space which can be planted beneath as previously described for Gooseberry and Blackcurrant. They are difficult to find grown in this way so you will need to patronise your friendly fruit growing nursery as standard currants are rare visitors to the garden centre!
Growing in Containers
Is perfectly possible, use a hearty loam based compost and a container of at least 8 litres capacity, siting in a nice sunny spot. Feed with seaweed extract Maxicrop or Osmocote tablets. Repot every fopurth year into fresh compost,l carefully removing and shaking away as much of the old soil as you can; this should take place during the dormant period October-March. All varieties are suitable, including cordon trained or standard options. Early dormancy following fruiting can occur but isn’t somethingto worry about. Protect the flowers from late frosts if these occur.
Propagation
Hardwood cuttings taken from October to February work best; 5” long stems from well ripened currant years wood root quite easily pushed into well cultivated ground to about a third of their length. They should be rooted by late Spring and may be moved to their final positions the following Autumn or winter. These cuttings can also be rooted in deep pots of loamy compost in a cold frame. Softwood cuttings from the new growths taken in summer can also be rooted in a propagator or heated bed system but the hardwood winter cuttings are easier and reliable and the preferred choice of most commercial nurseries. A standard currant has to be grafted on to a standard stem of Ribes aureum so this isn’t something that can be tried at home so to speak.
Tayberry and Loganberry
These blackberry relatives enjoy the same requirements and cultivation techniques. They are vigorous growing scandent shrubs with long arching stems which can be spiny [in the Tayberry variety ‘Medana’ and Loganberry type ‘LY59’] or smooth – Tayberry ‘Buckingham’ and popular Loganberry variety ‘LY654’ They require the support of either a wall or post and wire system. The white flowers appear in June so frost is not a problem and won’t inhibit fruit set. All varieties are self fertile. Harvest the fruits through July. The berries can be frozen, juiced and added to smoothies, eaten fresh, or make very powerful flavoursome jams; add them to pies with apple, raspberry or strawberries.
These plants can yield well for 10 years or more before the need for replacing arises. Fruiting generally commences the second year following planting.
The berries are long, raspberry shaped but larger and do not hull. They ripen to a deep claret purple and have a rich, powerful decadent flavour with aromatic undertones.
Spacing
You will need 8’ for each plant to be trained outwards regardless of variety; there are no compact forms yet on the market but these delicious fruits warrant the space where it is available.
Siting and soil
A good friable well fertilized soil brings about best results although most soil types are suitable if improved and these are not difficult to grow well. Full sun is a must and a sunny south or west facing wall is ideal of a post-wire support system running due South where possible or situated in an open sunny position. Completely frost hardy in all areas. Not suitable for container growing.
Soil preparation and planting
Is the same as for Blackberries which has been dealt with fully in our earlier article which you can Blackberries planting aftercare guide.
Expected yield
You can easily get 12ibs or more from a good Tayberry, the Medana type remains the heaviest cropping here, Loganberries may fruit a little less but only marginally, they are very productive also.
Propagation
Is difficult unless you have a heated bed or a large propagator. The plants are raised by leaf bud cuttings taken in late Summer and rooted under mist and with some bottom heat. Individual plants can also be obtained by rooting the trips of long vigorously growing stems buried shallowly into the ground in late Summer. When the new shoot arises the following Spring the old stem may be severed and the plant moved to it’s final spot.
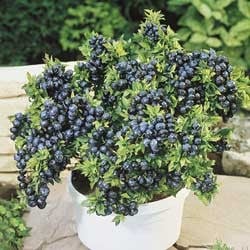
Blueberry Bushes
We have a huge range of Blueberry bushes here.
Sometimes mistakenly thought of as difficult to grow because they require a specific soil but as long as you provide a nice lime free [ericaceous] compost for them they are really quite simple and undemanding, hardy in all areas and suffering little from disease. If you are lucky to live in an area that grows Rhododendrons, Camellia or Azalea well then these plants require the same conditions as the Blueberry so you can go straight ahead and plant them, they will be fine. If, like many of us your soil contains lime then you can plant them in big pots of a proprietary ericaceous compost and sink this into the ground, or simply grow them conventionally in container on the patio or wherever.
The Blueberry makes an upright bushy shrub of approximately 5’ or so, after some years and it is attractive enough to take its place in the shrubbery or mixed border. The flowers appear in May and appear as slightly transluscent creamy drooping bells. It’s other main feature is the astonishing vivid Autumn leaf colours, brilliant orange, red and gold which rivals many an ornamental shrub in it’s finery. Bushes are relatively slow growing early in life but precocious too, usually beginning to fruit from the get-go.
The fruits have a sweetly aromatic subtle taste, more so than anodyne shop-bought fruits and are ideal for eating fresh sprinkled onto your breakfast cereal, as a snack, in a fruit salad, added to yogurts etc. They can also be made into jams and pies or juiced. The berries start to ripen in July and there is quite good seasonality with early and late varieties extending the picking period from late June through into August.
It should be noted that Blueberries are alone in the soft fruits in that individual plants need a pollinating partner, so never plant just one, always plant a set of two or more different varieties. Just about all varieties ‘go’ together so it doesn’t matter which ones you choose.
There are now some interesting variety variations becoming available. Although the vast majority of Blueberries remain deciduous which is where that stunning Autumn foliage colour comes from, one or two are evergreen or semi evergreen – Sunshine Blue falls into this category and it also has rather blue-tinged leaves which makes it quite a pretty prospect. There are also some newer varieties being released with much larger berries than normal, tewice the size of a usual Blueberry – look out for varieties such as Polaris and Chandler.
Planting Distance
Allow about 5’ or a little more between bushes.
Siting
They prefer a sunny aspect but will grow well with filtered sunshine/semi shade. Avoid baking hot and dry situations,
When to Plant
As Blueberry plants and bushes are invariably sold in containers they can be set out at any time, just remember that planting from late Spring through the Summer increases their requirement for regular watering until fully established. They can do just as well planted during the winter ready to grow in the following Spring and planting during the dormant period usually negates the need for watering unless the following Spring is a dry one.
Soil Preparation & Planting
See our earlier article which deals comprehensively with this information, you can Blueberry bushes planting aftercare.
Yield
You can expect a fully established bush in it’s prime to yield 6ibs or more but this tends to buold up over time. Bushes can remain productive for 10 years or more and suffer little from diseases.
Growing in containers
Surprisingly most commercial plantations are kept permanently in containers and drip fed water and nutrients. Equally surprisingly relatively small containers are used – 5 litres is the norm! Blueberries don’t have that larger root systems and what there is is quite fibrous so resist the urge to over-pot. For garden practice, I would recommend a 6 or 7 litre container as being ideal. Remember to use the that ericaceous compost which has no lime and is ideal for Blueberries and their relatives. It comes with nutrients already added for which will keep the plants happy for the first few weeks. Thereafter you can use a proprietary plant food for ericaceous subjects such as Grow Sure for Rhododendrons or Miracle Grows Azalea and Camellia feed which can be applied as per the instructions given on the pack. Regular watering is a must for Blueberries which hate to be dry but on the Nursery we find little and often is better than a good drenching and they do hate being waterlogged even for short periods; keep an eye on this and also set the container on crocks to make sure the water drains away quickly. Winter protection isn’t necessary unless the weather turns really cold.
Space Saving Options
Growing in pots is the best method and they can then be set wherever you want them, but remember you can incorporate them into the mixed flower border or the shrubbery; there are one or two shorter and more compact varieties such as ‘Top Hat’ and Sunshine Blue that suit smaller areas. Container growing does also tend to restrain the growth somewhat anyway. ]
Propagation
This is so tricky that even with professional nursery propagation systems with misting and heated beds, that the cutting success rate is often a meagre 30% and even then the rooted cuttings can be difficult to grow on. This is why the majority of plants intended for commercial production are actually raised from tissue culture.
Rhubarb
I think every garden should have a clump of good rhubarb! It’s a valuable standby that you only need to plant the once and it gives and gives for years on end. It is quite easy to care for and not very labour intensive, it requires no pruning for example and once you have planted it you can leave it be. Plus it’s the only fresh fruit you can have earlier in the Season; with forcing [easily done by placing an upturned bin over the clump] you can have rhubarb in season as early as March, and even without forcing some varieties such as Timperly Early are usually pullable in April. The season ends in July with the last late variety ‘Victoria’
Rhubarb makes a sizeable clump of thick stems which a large root. It dies away completely by late Summer; it can reach 4’ or more on good soils.
Rhubarb is excellent frozen or made into jams and pies. There used to be a lot of different varieties but many were lost to cultivation through virus or neglect. We have successfully brought together a collection of about ten varieties to choose from. Rhubarb thrives on a good, hearty rich soil which is why traditionally it used to planted in a corner by the compost bin – the other reason being it isn’t very pretty to look at!
Planting Distance
Allow 5’ between plants. This might seem a lot at first but once they have grown you will be thankful you allowed them the space.
Soil and Siting
Prefers an open position, or a semi shaded spot is also suitable as long as the soil is good. Rhubarb is prone to rotting so avoid any heavy or low lying areas that can get waterlogged especially during the winter. Don’t be alarmed when your rhubarb starts to wither away and die back in the summer, this is often normal as they can be quite dormant well before Autumn sets in.
When to plant
Bare root crowns are the easiest way of planting rhubarb and this should take place from October to March. Rhubarb is totally deciduous so at this time you will only be planting a root, be aware if frosts have ‘heaved’ or dislodged it from the soil later in the winter to re-bury it. Pot grown plants can be purchased for planting during the late Spring and summer.
Growing in Pots
Not an ideal project but good results have been achieved with a sizeable container or a large bucket with drainage holes. Never let them go dry, use a very hearty loam based compost. After three years the plants will need to be taken out, and divided as the pot will become too congested, re-plant the best plant and discard or plant out the rest in the garden. One advantage of container growing rhubarb is that it is easy to force by moving into a cold greenhouse in late Winter.
Propagation
This is usually done by division of established clumps when dormant. One can be quite ruthless in this – dig the clump up with as much root as possible [although you probably won’t be able to get it all as the roots are pretty formidable] Slice up into quarters with a sharp spade; as long as each piece has a good eye [bud] then it should grow. Re-plant into fresh soil. Where larger quantities are required and propagation material is scarce root cuttings consisting of healthy root segments about 3”long taken in the depths of winter can be inserted horizontally into pots or trays of gritty compost and kept in a cold frame over winter. These should not be disturbed until buds break the surface late the following Spring when they can carefully be individually potted into 3” pots of multipurpose compost. Such plants are ready may be ready for planting in their final positions that Autumn.
Seed can also be acquired which is easily germinated in seed trays at about seventy degrees, resultant plants do produce worthwhile crops but the quality isn’t as good as the better named varieties propagated vegetatively.
Cranberries
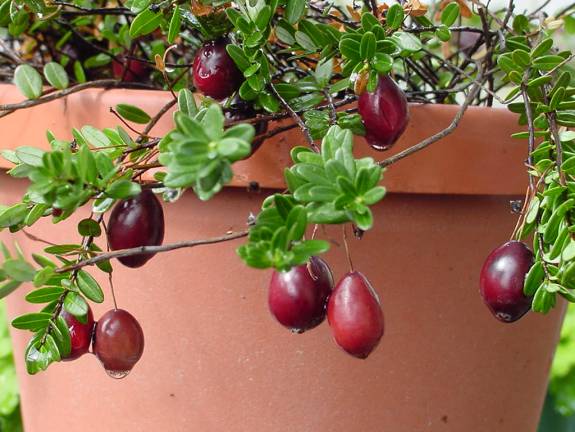
The Cranberry is a relative of the Blueberry and needs similar conditions – i.e. a good peaty ericaceous and lime free soil. However in the looks department you would never guess they were related at all! The Cranberry is a low semi scandent shrub of just a few inches in height and it has small dark, glossy evergreen leaves. The flowers are pink and bell shaped and appear in May. The brilliantly deep red fruit ripens in October and will keep well after picking in a ‘fridge.
As you would expect from a plant that grows wild in North America hardiness isn’t a problem and being of small stature it’s quite easy to provide the right soil conditions; even if you soil contains lime you can excavate a hole about 12 x 12” and fill it with a peat and sand mix, or some proprietary ericaceous compost and that should be fine. They also do well in pots. No pruning is required except for the removal of dead and tangled stems later in life.
Unlike Blueberries Cranberries are semi self fertile so even lone plants will fruit but you really need a couple to provide sufficient fruit to do something with. The fruit is very sharp and acidic, ideal for juicing of course with sugar or makes a wonderful – and easily made – jelly or sauce. They can do well in sun or shade too. There is a fairly limited range of similar varieties all of which have the same harvest season. Early Black and the enigmatically named ‘CN’ are the most popular ones here.
Yield
Established plants can give up to 1ib of fruit and will last for many years.
Planting Distance
Although quite short can spreada bit so allow 3-4’ between plkants, still quite easily accommodated!
When to Plant
Cranberries are virtually always sold in pots so they can be set at any time of year, winter is fine as they are quite hardy but Summer and Autumn seems to suit them just as well.
Growing in Containers
Fairly shallow pots and pans are best as the root system isn’t large. Fill with ericaceous compost and feed regularly with Maxicrop for Azalea and Rhodoendron, or a similar brand. They do not like to be dry so regular watering is a must-do.
Propagation
You will find the stems may root into the soil as they go so it should be fairly easy to find rooted sections which can be gently cut off at about 2” length and set into 3”pots of ericaceous compost. They should be ready for planting out 12 months later.
Figs
Figs are very variable in habit and to a certain extent make their coat according to the cloth that is available to them. You will see figs grown in fertile soil with space that have developed into real trees yet they can equally be kept quite small in smaller spaces or grown in buckets or pots. TGhey are easy to grow and quite undemanding, it is often said that poor soil suits them better because it curbs their vigour and results in more fruit. But an established tree bedecked in it’s big heart shaped indented foliage and alive with ripe plump fruit is a wonderful thing too! The fig is relatively cold hardy and can be grown outside reliably in most areas, in the far North it will benefit from a protected spot.
Pruning is best undertaken late in the Autumn or early Spring; this is because the stems bleed a milky [non-poisonous] sap when in growth. It is only necessary if the plant needs controlling or curbing.
Figs start to yield very early in life. They are slow growing early in life and may be only a few inches tall when you receive them yet they often start to crop just a few months later!
The fruits can ripen at any time during the growing season and often appear in succession.
The most reliable varieties are Brown Turkey and Brunswick, White Marseilles is also worth trying. There are some new additions coming over from the continent which may be less reliable in the AUK climate and better suited to a greenhouse or conservatory.
Siting
It has to be said a warm wall brings about the most luscious fruits, South or West facing is deal, North and East is unsuitable. Figs can cope with quite dry conditions once established but the best quality fruits will come with adequate moisture levels. They can be grown free standing as well in a nice warm sunny sheltered spot and also be grown under glass or in a polytunnel.
When to plant
Figs are always sold in pots so planting can commence at any time of year.
Growing in containers
This is one of the most effective ways to grow Figs and results in early crops at the expense of too much growth. Choose a good 12-15 litre container and use a loam based compost such as John Innes no 2 or similar. Feed regularly with a potash based fertilizer. Can stay indefinitely in the same container, if cropping starts to deteriorate then take it out of the pot, shake away some of the compost and gently tease out some of the roots, re-potting into fresh soil as before.